

Managing website visibility feels like a battle against automated bots. Many struggle with server overloads or finding their private admin pages indexed in search results because they haven’t implemented a proper definition and rules for automated bots.
The solution lies in a simple yet powerful plain-text document known as the robots.txt file.
In this robots txt full guide, you’ll learn how to create robots.txt directives, understand robots.txt syntax, advanced AI blocking techniques, and use a robots.txt generator to ensure your website remains professional and secure.
2) Blocks AI Scrapers: You can use a deny robots.txt command to stop specific Google robots.txt or AI agents from scraping your original content.
3) Optimizes Crawl Budget: A proper robots.txt setup prevents search engines from wasting resources on low-value pages, like robots disallowing admin areas.
4) Essential SEO Tool: Mastering seo robots txt is a pillar of technical optimization, ensuring your high-value pages rank while you block robots.txt from private folders.
A robots.txt file is a set of rules or files that tell crawlers about pages to crawl and to avoid using Allow and Disallow rules. This plain-text document is hosted at the root directory of the website and manages bot traffic to prevent server overload.
The robots.txt file functions under the Robots Exclusion Protocol (REP) and serves as a "Code of Conduct" for automated agents, including search engine spiders like Googlebot and AI training crawlers.
Here is a breakdown of the basic robots.txt syntax and an explanation of each term:
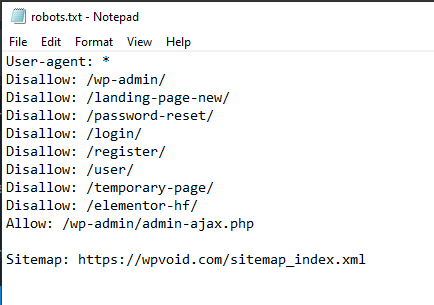
User-agent: *
Disallow: /wp-admin/
Allow: /wp-admin/
Sitemap: https://wpvoid.com/sitemap.xmlb) Disallow: /wp-admin/ – This is a standard security and SEO practice. It prevents bots from wasting time crawling your backend login and management pages, such as admin, which should never appear in Google search results.
c) Allow: /wp-admin/admin-ajax.php – WordPress uses this specific file to load dynamic content (like some menus or popups). Allowing it will ensure that your site functions correctly for the crawler.
d) Sitemap: This provides a direct roadmap for bots to find your latest blog posts and pages.
The robots.txt file might seem like a minor technical detail, but it is considered the pillar of the SEO robots.txt strategy. Here is why it is essential for every SEO strategist.
b) Preventing Server Overload: Sometimes, the high-frequency bots, particularly new AI crawler bots, can put a massive strain on the website server. Adding robots.txt helps to throttle this activity in an efficient way.
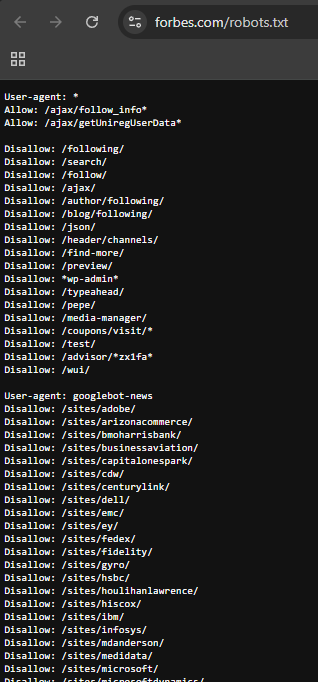
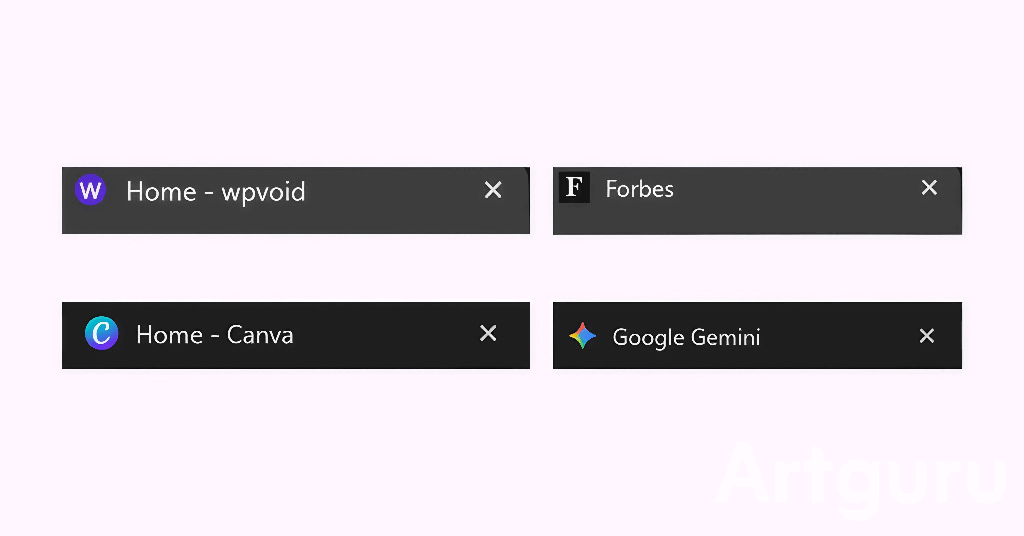
c) Blocking Specific Bots: Blocking particular bots is prominent in a media site. To cite an example, news sites like Forbes, The New York Times, etc, often block AI agents from scraping their articles to ensure their factual reporting isn't used to train LLMs without compensation or credit.
d) Managing Media Indexing: While it's not great for hiding HTML pages, robots.txt is very effective at keeping images, videos, and audio files from showing up in Google Search results.
Warning: To keep a page entirely private or "noindexed," do not rely on robots.txt. Instead, you should use password protection or a noindex meta tag.
Creating a robots.txt file is super easy, while using an effective strategy is a must. Here is a list of things to ponder before making a robots.txt file.
1) Identifying the Bot Agent: Make sure to tailor instructions to specific bots. For instance, if you want Google to see everything but want to block Bing, you would use User-agent: bingbot.
2) Strategic Blocking: Ensure the common candidates on your site have a robots.txt disallow command, such as:
a) Admin panels (e.g., /wp-admin/)
b) Temporary or staging areas.
c) Search result pages within your own site.
d) Duplicate content versions.
3) Search Console Verification: Once you upload your file, make sure it works. You can use the robots.txt Tester provided by Google in the Google Search Console.
A) Upload: Ensure it is at yourdomain.com/robots.txt.
B) Verify: Use the Search Console to see if Googlebot encounters any errors or warnings.
C) Check Status: If you accidentally block Googlebot, your site will disappear from search results. Always double-check!
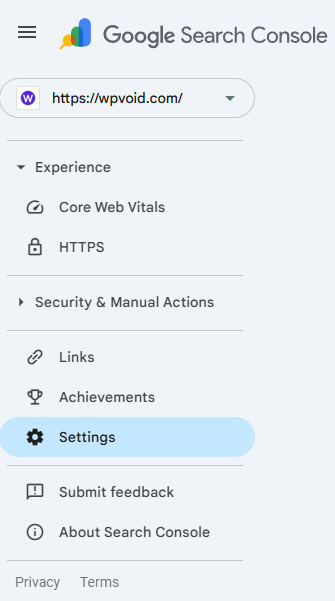
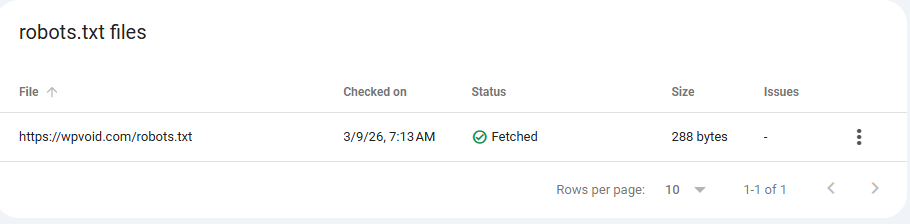
You can ensure that your robots.txt file is valid or not through Google’s Search Console. To check the status, follow these simple steps:
Step 1: Open the Search Console.
Step 2: Navigate to Settings on the left-hand side.
Step 3: Search for the Crawling section and open the report of the robots.txt file.

Step 4: Check the status, whether it’s fetched or not.
Here is the list of famous websites’ robots.txt and how they handle their crawlers:
Forbes: Their file demonstrates complex management of massive content volumes, optimizing how search engines crawl and index their extensive article database.
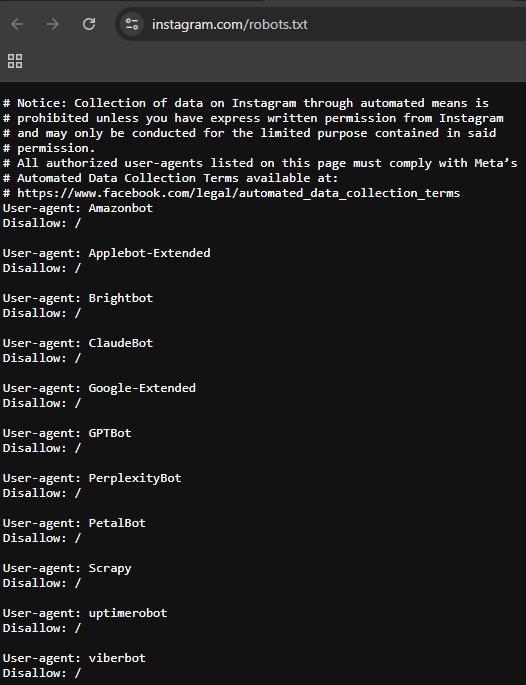
Instagram: This file serves as a primary example of strict "Disallow" rules, prioritizing user privacy by limiting bot access to sensitive areas.
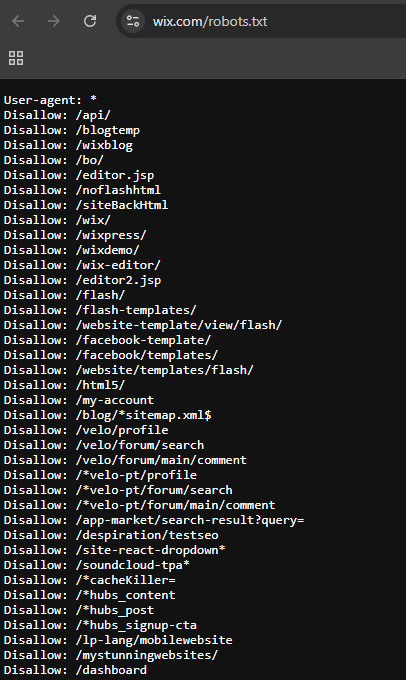
Wix: This example highlights how a major web platform manages crawling rules to protect and organize its underlying technical infrastructure.
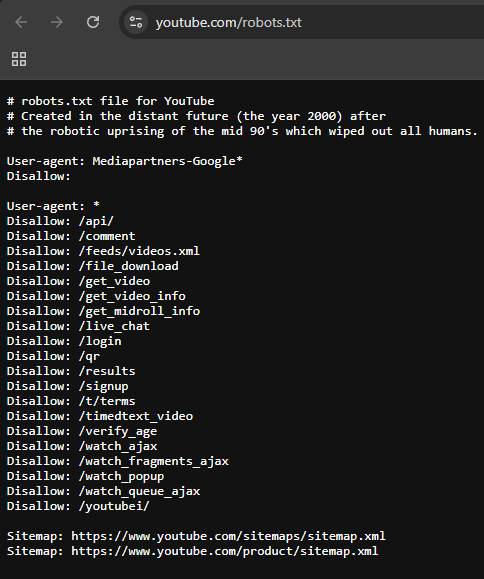
YouTube: Famous for including a humorous "Easter Egg" about a robotic uprising of the year 2000!. This file effectively balances technical instructions with personality.
There are two primary ways to generate robots.txt files, depending on your technical comfort level.
Step 1: Open Notepad (Windows) or TextEdit (Mac).
Step 2: Type your directives (e.g., User-agent: * followed by Disallow: /).
Step 4: Upload it to the root directory of your website via FTP or your hosting file manager.

Step 1: Install an SEO plugin.
Step 2: Navigate to the "Tools" or "File Editor" section.
Step 3: The plugin will provide an interface to edit the robots.txt content without needing to leave your dashboard.
Setting up a robots.txt file is a fundamental step in technical SEO, especially for an SEO optimization process.
Here is your step-by-step guide to building one from scratch, following professional standards for 2026.
Step 1: Define the User-Agent
Every robots.txt file starts by identifying who the rules apply to.
Syntax: User-agent: *

Meaning of the *: The asterisk (*) is a wildcard. It tells every bot on the internet (Google, Bing, DuckDuckGo, and scrapers) to follow the rules that follow this line.
Syntax: User-agent: *

Meaning of the syntax: The asterisk (*) is a wildcard. It tells every bot on the internet (Google, Bing, DuckDuckGo, and scrapers) to follow the rules that follow this line.
Step 2: Set Universal Disallows (The "Stay Out" Rules)
Now, you tell those bots which parts of your site are off-limits or to block. For a WordPress site, you want to protect your backend and login pages.
Syntax: Disallow: /wp-admin/

Meaning of syntax: This blocks bots from crawling your administrative dashboard. It saves your "crawl budget" for actual content pages.
Syntax: Disallow: /wp-login.php

Meaning of syntax: Specifically blocks the login page to reduce bot-driven login attempts.
Step 3: Protecting Your Content from AI Bots
If your website publishes original tutorials or news, you may want to prevent AI companies from "scraping" your data to train their models without permission. To do this, you address specific AI user-agents.
1) Blocking OpenAI (ChatGPT/GPT-4)
OpenAI uses a bot called GPTBot. Blocking this prevents your data from being used to train future versions of ChatGPT.
Syntax:

User-agent: GPTBot
Disallow: /2) Blocking Anthropic (Claude)
Anthropic’s crawler is identified as anthropic-ai.
Syntax:

User-agent: anthropic-ai
Disallow: /
3) Blocking Google’s AI Training (Gemini)
Google uses a specific toggle called Google-Extended. Blocking this ensures your content isn't used to improve Gemini or Vertex AI models.
Syntax:

User-agent: Google-Extended
Disallow: /
4) Blocking Common Scrapers (CCBot)
CCBot is the crawler for Common Crawl, a massive data repository often used by various smaller AI companies to train their models.
Syntax:

User-agent: CCBot
Disallow: /OVERALL SYNTAX:
# Step 1: Rules for all Search Engines
User-agent: *
Disallow: /wp-admin/
Disallow: /wp-login.php
Disallow: /xmlrpc.php
Allow: /wp-admin/admin-ajax.php
# Step 2: Pages to keep out of search results
Disallow: /search/
Disallow: /author/
Disallow: /tag/
# Step 3: Block specific AI Scrapers (Claude, GPT, Gemini)
User-agent: GPTBot
Disallow: /
User-agent: anthropic-ai
Disallow: /
User-agent: Google-Extended
Disallow: /
User-agent: CCBot
Disallow: /
# Step 4: Global Sitemap Location
Sitemap: https://wpvoid.com/sitemap_index.xml
Does robots.txt hide my page from Google?
No. It tells Google not to crawl the page. If another website links to your page, Google may still index the URL and show it in search results without a description. To truly hide a page, use the noindex tag.
Where should I put the robots.txt file?
It must be in the root directory. If your site is wpvoid.com, the file must be at wpvoid.com/robots.txt. If you put it in a subdirectory like wpvoid.com/assets/robots.txt, crawlers will never find it.
Why does Google ignore my "Crawl-delay" command?
Google believes its algorithms are better at determining your server's capacity than a static number. To change Google's crawl rate, you must use settings within Google Search Console.
What does "User-agent: * Disallow: /" mean?
This command tells all web crawlers (e.g., Googlebot, Bingbot) not to crawl or index any part of the website.
Can I have more than one robots.txt file?
No. Each domain or subdomain can only have one. If you have blog.mysite.com and mysite.com, they each need their own separate file in their respective root directories.

You might have noticed the tiny and distinctive graphic in your browser when you open many webpages. Those small images represent the brand and are called a favicon.
Here, in this article, we will explain what is a favicon, best practices for its size and formats, and lastly, the step-by-step guide on how to create it and add it to your site using plugins or raw HTML code.
A favicon, known as a “ favorite icon,” is a tiny icon in a square or circular shape that we see on the browser tab. This icon represents a website and is considered a critical component of its branding and user experience.
The purpose of a favicon is to visually identify web pages and applications in browser tabs, address bars, and shortcuts. Sometimes, it works as the logo of the website; however, these two things, i.e, favicon and logo, are different.
When creating a favicon for your website, you need to consider its size and requirements for optimization on every device. Considering these factors will help in SEO and appearance on different platforms or apps.
The required size of a favicon varies depending on where it will be displayed:
a) 16x16px: The standard size for the browser address bar and tabs.
b) 32x32px: Used for desktop shortcuts and the Windows taskbar.
c) 48x48px, 64x64px: For various desktop displays.
180x180px: Specifically for Apple's touch icons (e.g., iPhone/iPad home screen).
The size of the favicon varies, such as 16*16px for tabs or address bar, 32*32px for bookmarks or desktop.
According to Google, the minimum size of a favicon image should be at least 8*8px, while they recommend using a larger image than 48*48px, as they look better on various surfaces.
For a better understanding, you should create a dimension of the favicon picture of 512*512px. This size will look better on every device and surface, so you don’t need to create for each one.
Moreover, the file size of your favicon picture or icon should be less than 10KB.
Favicon image has various formats to use, such as ICO, PNG, JPEG, or SVG. Among them, PNG is the most common one that people use.
Previously, the “ .ico ” format was prominent, but nowadays, the “ PNG ” format is used more as it supports transparency and offers more clarity than ICO.
Creating a favicon is a simple and easy process. Using simple tools and websites like Canva or Favicon.io, anyone can make a favicon for their site.
Here is the list of the best favicon generator online sites to build a favicon.
1) Favicon.io : Free Favicon icons generator for PNG or text. It also provides the full HTML code for all the formats, such as .ico, PNG, Android, and Apple.
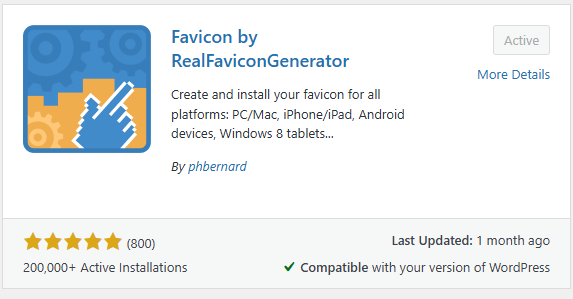
2) RealFaviconGenerator: Online generator for all the platform-specific icons (Apple Touch, Android, Windows Metro) and ensures the quality and compatibility of the icons.
3) Favic-o-Matic: Simple drag-and-drop interface that provides the standard “ .ico ” file. Moreover, it generates the packages of images in PNG format while compressing their file size. This is the recommended site for a favicon generator from PNG.
4) Canva: You can create a favicon online using Canva. You can generate any size and format of favicon, including PNG, JPEG. Moreover, the paid version offers more features like transparent and file compression.
A favicon can be added to the site using various methods, such as using dedicated plugins for WordPress, manually, or embedding HTML code inside the tag. Here are the different processes to implement.
WordPress provides many plugins to add a favicon to your site. Here is the step-by-step guide to setting up a favicon using a WordPress plugin.
Step 1: Log in to your WordPress Dashboard
Step 2: Go to the Plugin Section and click on Add Plugin
Step 3: Search for “ wp favicon ” and look for favicon by RealFaviconGenerator
Step 4: Install and Navigate to Appearance
Step 5: Select the Favicon option
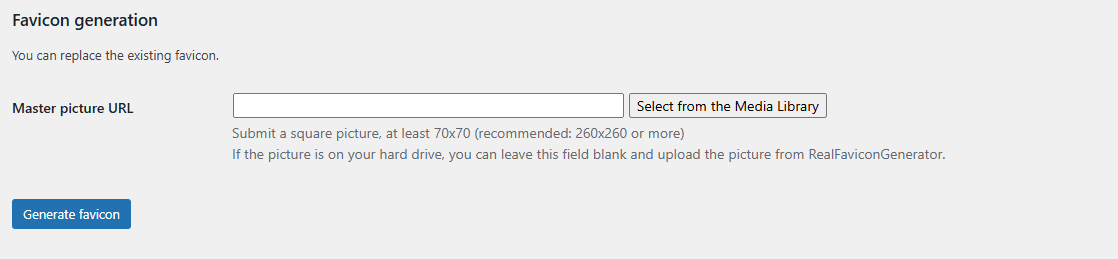
Step 6: Now paste the favicon URL or paste the favicon file
Step 7: Now customize your favicon
Step 8: Click on Generate and install Favicon button to add a favicon in WordPress
WordPress allows you to add your custom favicon picture through the theme settings. Here is the step-by-step guide to creating a favicon or site icon in WordPress manually.
Step 1: Log in to the Admin Dashboard
Step 2: Navigate to Appearance and select Customize
Step 3: Click on the Site Identity and go to the Site Icon section
Step 4: Now, change or upload your favicon picture in Site Icon for WordPress
Step 5: Save Changes and Publish. You will see the changes in a short time.
Favicons are usually placed inside the head of the HTML code. When you add the favicon to your site, you need to use the tag to define the type of favicon and its URL.
Here is the process to add a favicon to an HTML code.
Step 1: Log in to the Admin Dashboard and open the file manager
[ If you found the index.html file, edit the file; otherwise, move to another step ]
Step 2: Select the “public_html” folder

Step 3: Select “ wp-content ” and choose the “ themes ” option

Step 4: Choose your theme name and search for the “header.php” file

Step 5: Now, back up the file if needed. And add the favicon code inside the tag of the HTML code.
Step 6: Sample code for PNG favicon
<link rel="icon" type="image/png" href="favicon.png">To add favicon code, you need to use the tag. The tag comprises various properties, including relationships, type, and icon URL location.
/* If you have normal ICO image, insert this code inside the head tag */

<link rel="icon" type="image/x-icon" href="favicon.ico">
/* For an animated ICO image, add this code */

<link rel="icon" type="image/gif" href="animated_favicon.gif">
/* To add favicon SVG image */

<link rel="icon" type="image/svg+xml" href="favicon.svg">
/* For a Favicon icon PNG image */

<link rel="icon" type="image/png" href="favicon.png">
What is the ideal favicon size in pixels?
According to Google and WordPress, the ideal size for the source image that you upload is 512x512 pixels, as it scales down perfectly to the 16* 16 px size used in browser tabs.
What is the best format for a favicon?
The PNG format is considered the best format for modern favicons because of its transparency and high-quality scaling. Moreover, the older ICO format is still sometimes used for backward compatibility, and SVG is an excellent, future-proof option to use.
Why is my favicon not showing up on Google search results?
There are several reasons for not showing the favicon on Google search results, such as the file is crawlable by Google (not blocked by robots.txt), and your favicon size is less than 48*48 pixels. Sometimes, it will take a few days or weeks for Google to recrawl and index the new icon.
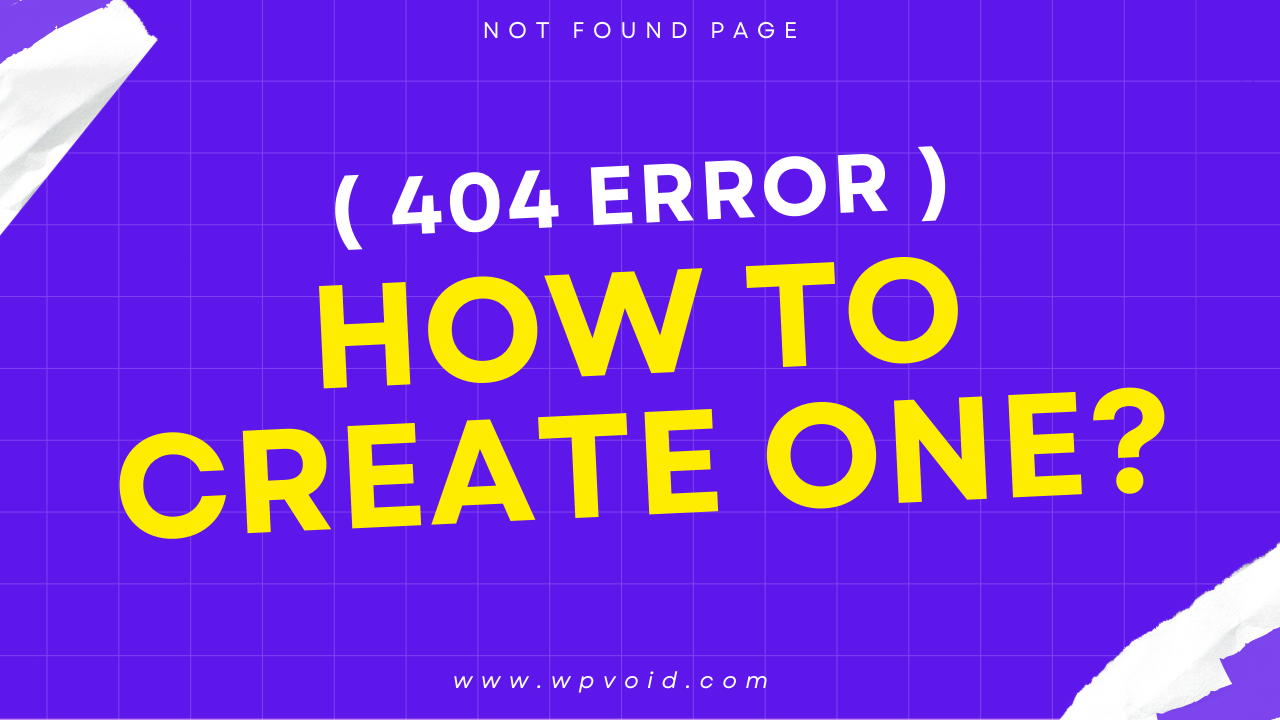
When you type an incorrect URL or search for a non-existent product, you will land on a page known as the 404 page. Sometimes this page is a hard 404 or a soft 404 page. These two pages are different as they send their own HTTP status code when the user requests it.
This article will provide you with a comprehensive guide about the 404 page, its types, importance, inspirational examples to look at, and how to create 404 page of your own.
A 404 Page or a 404 Not Found page is an HTTP status code that a web server sends to the user when they try to access content or open a URL that is either deleted, moved, or simply does not exist. In simpler words, if you try to open or access the web content or the link URL that doesn’t exist or has been deleted, then the website will show you the 404 error page.
For instance, if you open or access this URL on our website https://wpvoid.com/kchayr , then you will encounter a 404 web page, as this page does not exist in the WPVOID database. Or, if you try to open the old URL that was already deleted or moved, then the server will show http status 404 Not Found page.
To better understand the 404 not found, imagine this: You are doing online shopping on Amazon. You liked the product, you saved the URL, but you plan to buy it after a few weeks. Unfortunately, Amazon deletes the product, the reason might be any, such as being out of stock, the supplier stopping selling, or no more manufacturing of that product.
Now, if you open that link, you will see a 404 not found site, as it does not exist anymore, and sadly, you might end up being frustrated. However, a well-designed and interesting 404 page can mitigate this frustration by guiding the user back to valuable content.
It’s obvious that a 404 not found error is fundamentally an issue, but if the website owner handles it carefully, it can ultimately reduce bounce rate and gain more traffic, while maintaining the brand's existence.
Here is the list of the importance of custom not found 404 page and how it can positively affect the SEO and lead to opportunities:
The default 404 page often has a jarring and boring design, which might lead to frustration and inconvenience to the user. The 404 page should not contain a dead end. Having a user-friendly and clear navigational option helps the user to have a better user experience and preserve their trust.
Web visitors can easily bounce back to the serp back when they encounter a boring and no way 404 page. Instead of having a simple page that comes as a default page, the web designer should incorporate some design, such as links to the homepage, search bars, popular posts, or main categories.
This practice will encourage visitors to explore other pages that the user might be interested in, which helps in gaining potential Traffic and reducing the Bounce Rate.
The 404 error page can be a blessing in disguise, as it helps to capture a lead if implemented properly. Business owners or developers add an interesting call-to-action(CTA) or a link to a subscription box for a newsletter, or just a link to a contact form. These practices can effectively turn the lost visitor into a potential lead.
While a genuine 404 error page does not affect your SEO performance, it will reduce user frustration if implemented with interesting and easy user navigation. Past that, the improperly configured, also known as soft 404, can be damaging. So while creating the 404 page, developers need to ensure the server sends a 404 response signal, not the 200 OK status code.
A Soft 404 error is a 404 not found error where the server sends the HTTP 200 OK status code, instead of a 404 error code. In simpler terms, when the 404 error page throws a 200 status code, it means that everything is OK on the server side, which is known as a soft 404 error page.
404 error pages are usually of two types. The first one is a Hard 404 page or a Normal 404 page, and the other is a soft 404 error page.
The business owners or the developer do not create the soft 404 page; however, the tools or CMS sometimes automatically create the soft 404 page. The soft 404 page is harmful for SEO as it can trick Google or its crawler.
For instance, if you create a 404 error page and you index that page, then it will be a soft 404 page. Whenever the visitor tries to access the non-existent content, they will be redirected to the 404 page that states there is no such URL or content.
However, the server sends a 200 OK response, as you have indexed it. So, to avoid a soft 404 error page, you should not index the custom 404 error page.
You can check using various methods, such as Inspection URL on search console, or Inspecting elements on the browser, to identify whether your page is a Normal ( Hard ) 404 or a Soft 404 page.
The primary goal of this method is to check whether Google indexes it or not. Here is the explanation of the method and its process:
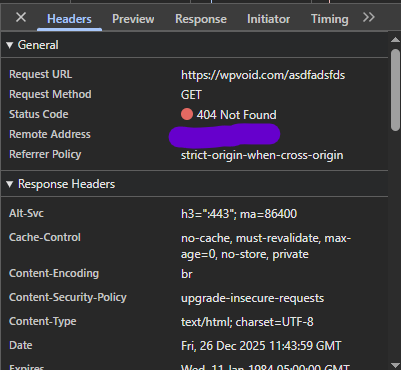
To see whether your 404 page is Soft or Hard on Search Console, follow these steps:
Step 1: Open your Google Search Console account
Step 2: Click on the URL Inspection, or simply paste the 404 page URL in the inspect URL field at the top of Console.
Step 3: Check whether the 404 page is indexed or not. The Soft 404 page means the page that is indexed by Google or a browser, and they send a 200 OK status.
Step 4: If your 404 page is indexed, then you can consider it a soft 404 page. The Normal 404 page should not be indexed, and it sends a 404 status code.
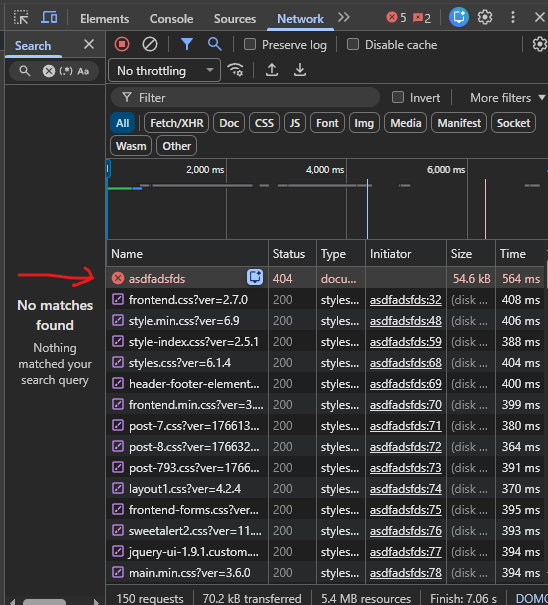
You can use the browser's inspect element to check the types of 404 pages. Here are simple steps to follow:
Step 1: Open the 404 pages in the Google browser
Step 2: Right-click and click on Inspect
Step 3: Click on the “ Network ”
Step 4: Press the “Reload Page” button
Step 5: Check the code status. If you found http 404 response code, then it's a Normal (Hard) 404 page, which is good for SEO.
Here is a list of the 5 best 404 pages examples to look at as an inspiration, and how they make interesting and engaging 404 pages not found on their site.

If you see Google’s 404 error page, it is simple, and the design is so clean and minimalistic. They clearly state that the page is 404 not found, and it's an error.
Moreover, they also mention that the typed / written URL is incorrect, with a broken machine picture.
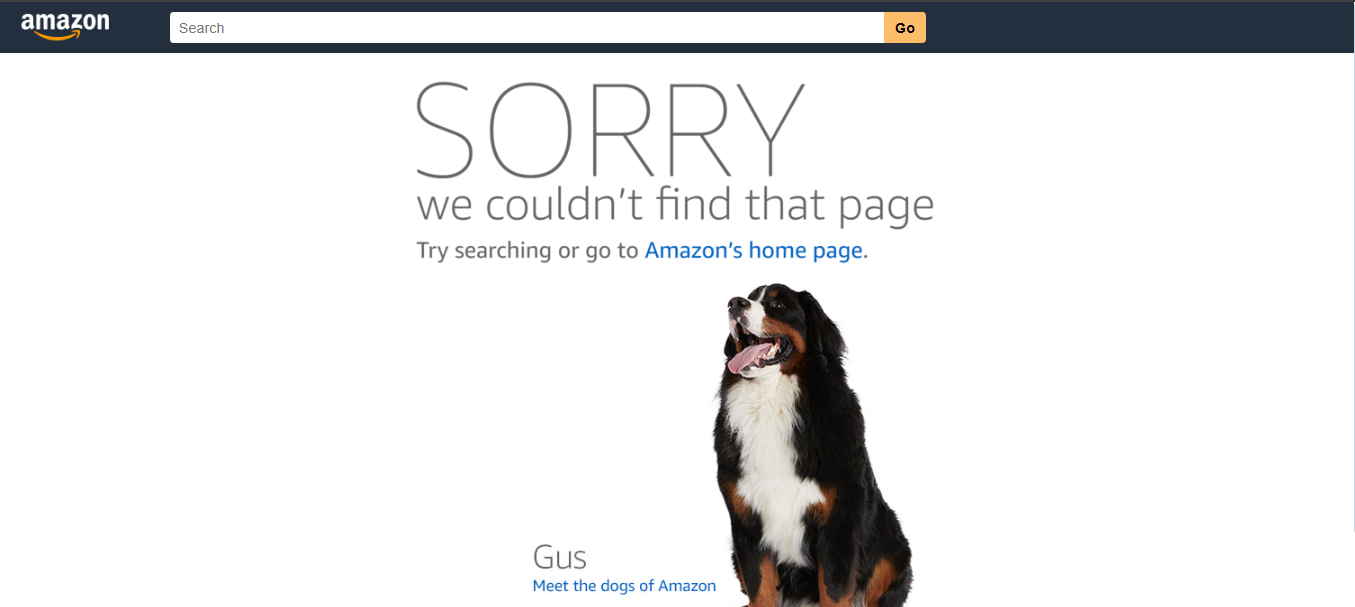
Amazon's 404 error page has a simple design, yet functional. They have added the search bar to find the desired product and the text to return Amazon homepage.
Did you notice something interesting here?? Yes!! The dog one. They have added the link to the dog picture. This is something so random, yet more interesting.
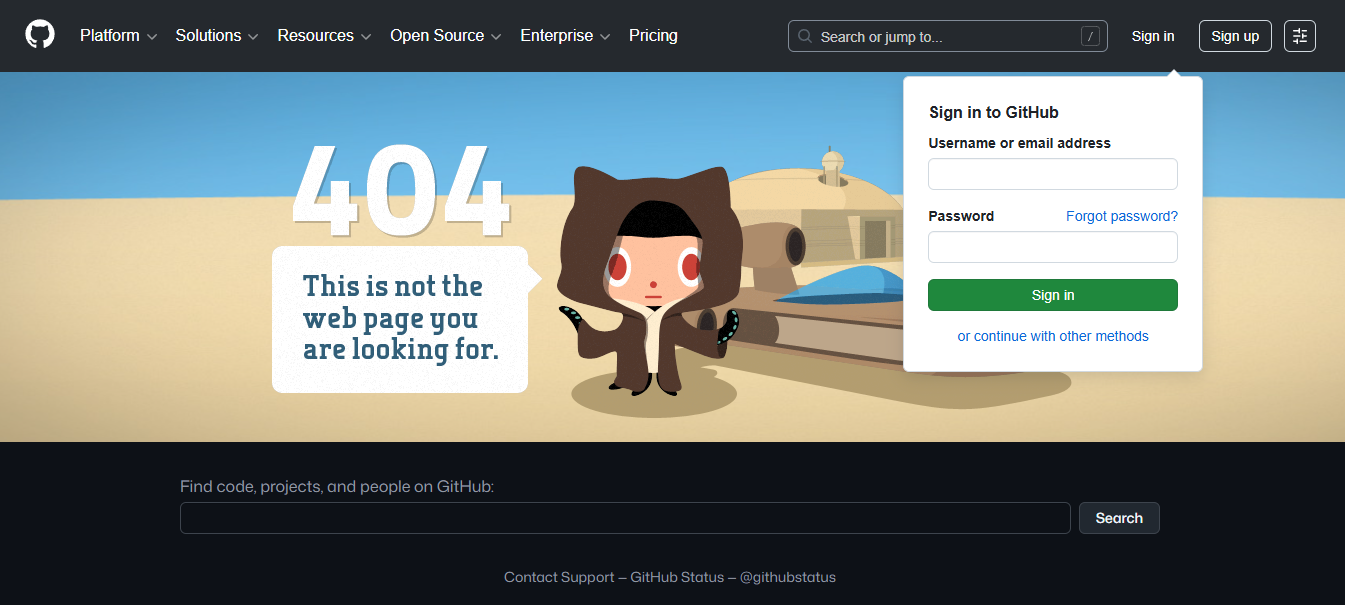
GitHub has a creative and stylized image with the animated 404 image. The user can log in, navigate the mega menu, sign up, or search the project repository through the 404 page. They have included almost everything from the heading, footer, to the subscribe button.
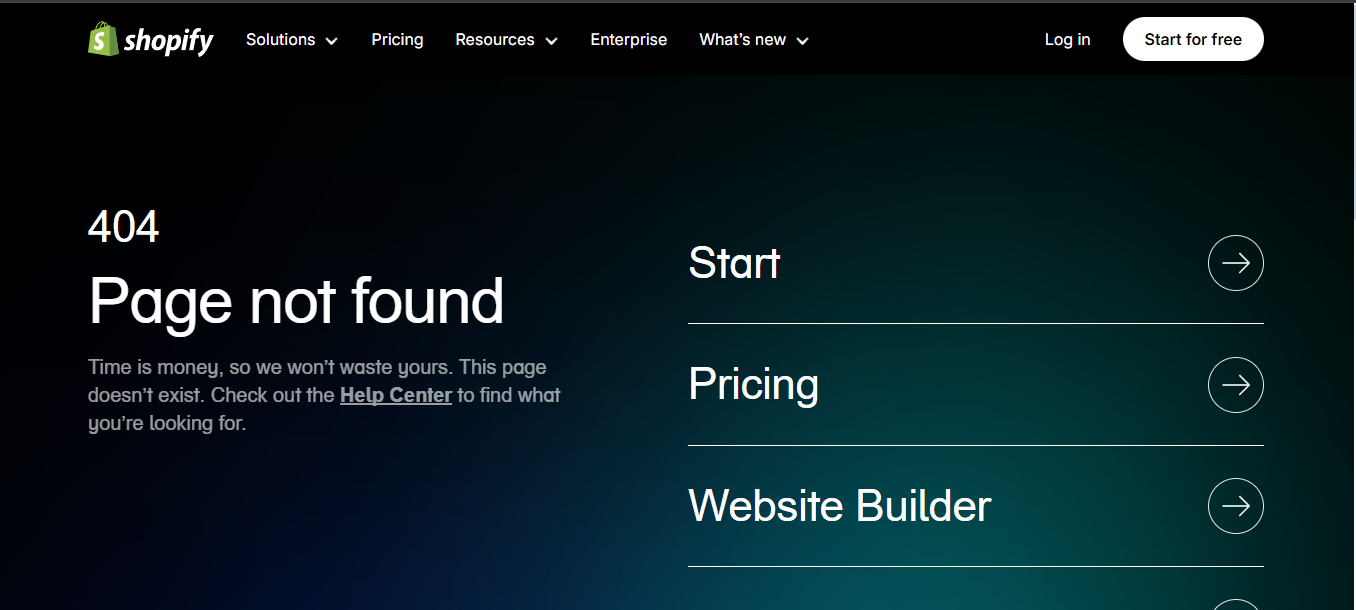
Shopify's 404 page has a design focused on capturing a lead or saving the user time, as they can easily navigate to the help center. They have included almost every important page of their site on the 404 error page, including pricing, login, getting started, and all others.
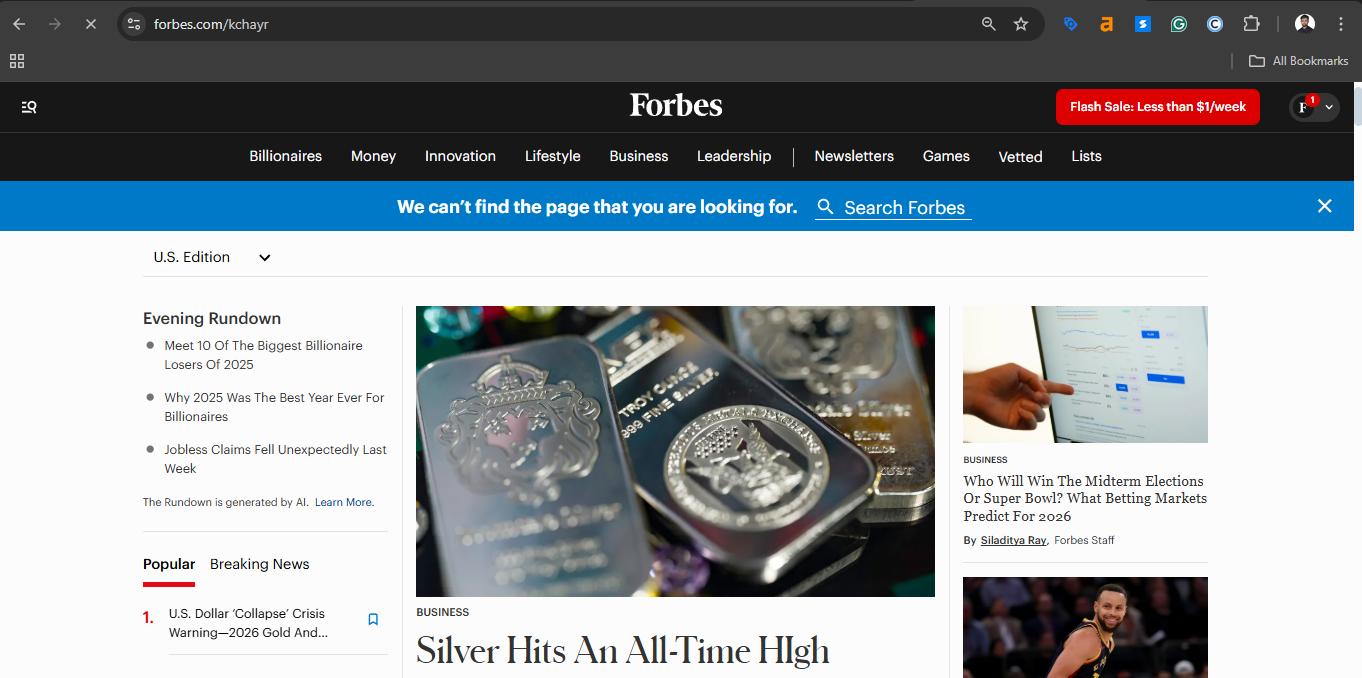
Forbes' 404 error page has many blogs, such as trending, popular, and newest articles. Their 404 page looks almost page rather than a 404 page.
However, it's a hard 404 page, which means it sends a 404 status code when you request the page. Moreover, the primary purpose of the Forbes 404 error page is to generate traffic, as it is a news website.
WordPress allows you to edit, customize, or create a custom 404 page for your site. Here is the step-by-step guide to edit 404 page in WordPress using a plugin:
Step 1: Log in to the WordPress dashboard
Step 2: Create your custom 404 error page if you don’t have one. You can use Elementor or any WordPress editor to create.
Step 3: Navigate to the Plugins Section and Search for “ 404 page ”
Step 4: Install the Smart Custom 404 Error page plugin
Step 5: Go to Appearance and Click on “ 404 Error Page ”

Step 6: Now choose your custom 404 page and Save Changes. Here the page name is custom 404 error page.
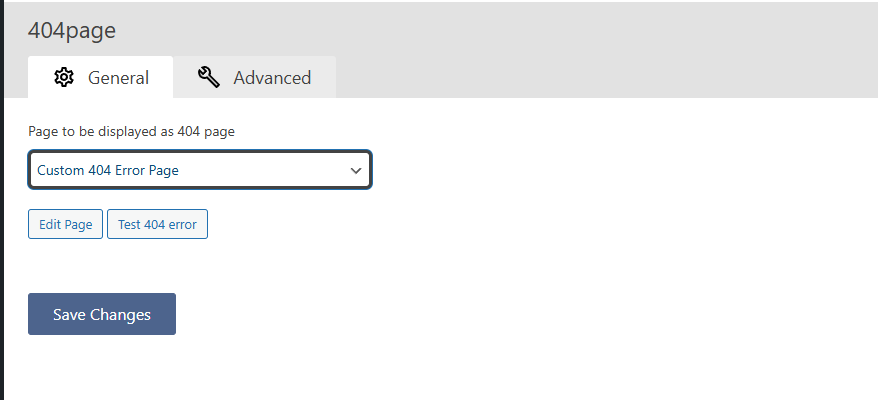
Note: Do not index your 404 page. Indexing this page will return a 200 OK status code when calling, and it is considered a Soft 404 error page, which is bad for SEO.
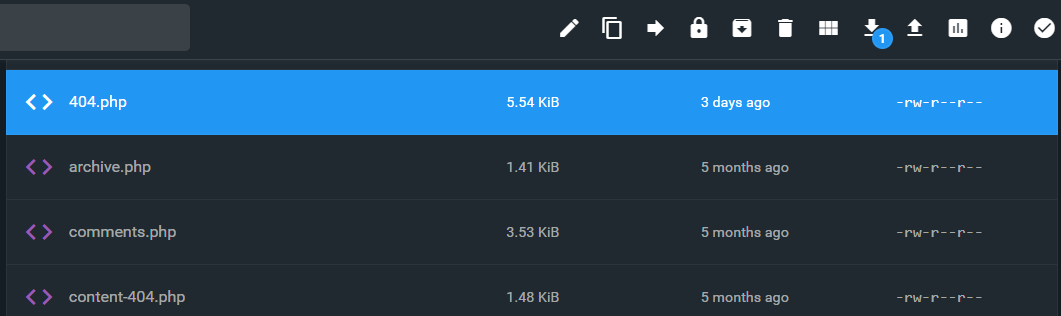
You can create a custom 404 error page on WordPress by editing or creating the 404.php file. This is the manual process where you need to change the website content/code by accessing the file manager.
Here is the step-by-step process to add a custom 404 not found page without plugins on your WordPress site.
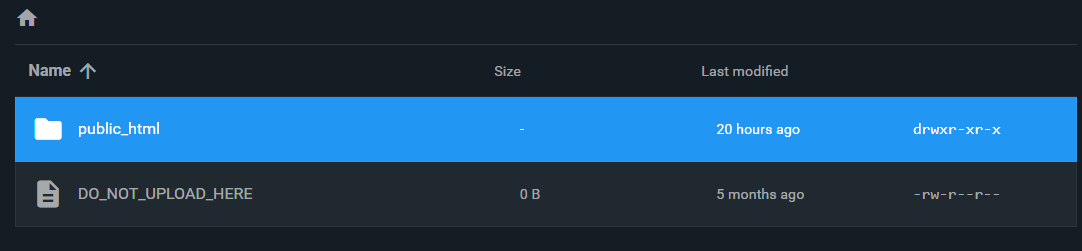
Step 1: Log in to your Admin Dashboard
Step 2: Make sure you have a backup of the site or 404 page
Step 3: Click on the File Manager and open the public_html folder
Step 4: Navigate to wp-content

Step 5: Open the themes folder

Step 6: Choose your theme name
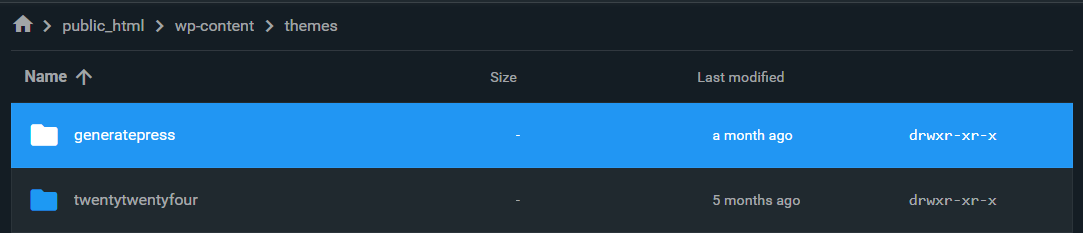
Step 7: Now, create or edit the 404.php file
Step 8: Make sure to back up the 404.php file before editing it.

Step 9: Now, add your HTML/CSS code between the get_header () and get_footer () PHP functions.
The full and comprehensive design is definitely based on the website's nature and motive. Some sites are meant to generate traffic, capture leads, and serve other purposes.
Here are 3 free basic code samples of effective 404 pages to look for ideas and inspiration. To use for your site you might need extra design and customization.
<!DOCTYPE html>
<html lang="en">
<head>
    <meta charset="UTF-8">
    <meta name="viewport" content="width=device-width, initial-scale=1.0">
    <title>404 Not Found | wpvoid</title>
    <style>
        /* New Color Palette: */
        /* Main Accent: #8c52ff */
        /* Background: #fef6ff */
        /* Text Color: #1e1926 */

        /* --- Base 404 Styling --- */
        .wpvoid-modern-404 {
            display: flex;
            flex-direction: column;
            align-items: center;
            text-align: center;
            padding: 20px;
            min-height: 80vh;
            justify-content: center;
            background-color: #fef6ff; /* Updated Background Color */
            font-family: Arial, sans-serif;
            color: #1e1926; /* Updated Text Color */
        }

        .wpvoid-modern-404 .error-content-area {
            max-width: 600px;
            margin-top: 20px;
        }

        .wpvoid-modern-404 h1 {
            font-size: 3em;
            color: #1e1926; /* Updated Text Color */
            margin-bottom: 10px;
            border-bottom: 3px solid #8c52ff; /* Updated Accent Color */
            display: inline-block;
            padding-bottom: 5px;
        }

        .wpvoid-modern-404 .subtitle {
            font-size: 1.2em;
            color: #1e1926; /* Updated Text Color */
            margin-bottom: 25px;
        }

        .wpvoid-modern-404 .error-image {
            max-width: 90%;
            height: auto;
            margin-bottom: 30px;
        }

        /* --- Search Form Styling --- */
        .wpvoid-modern-404 .search-form-wrapper {
            margin-bottom: 30px;
            width: 100%;
        }

        .wpvoid-modern-404 .search-form {
            display: flex;
            border: 2px solid #ddd;
            border-radius: 8px;
            overflow: hidden;
            box-shadow: 0 2px 4px rgba(0, 0, 0, 0.05);
        }

        .wpvoid-modern-404 .search-field {
            flex-grow: 1;
            padding: 12px 15px;
            border: none;
            font-size: 1em;
            outline: none;
            color: #1e1926; /* Ensure input text is readable */
            background-color: #fff;
        }

        .wpvoid-modern-404 .search-submit {
            background-color: #8c52ff; /* Updated Accent Color */
            color: white;
            padding: 12px 20px;
            border: none;
            cursor: pointer;
            font-weight: bold;
            transition: background-color 0.3s;
        }

        .wpvoid-modern-404 .search-submit:hover {
            background-color: #7a46e0; /* Slightly darker purple for hover */
        }

        /* --- Button Styling --- */
        .wpvoid-modern-404 .navigation-links {
            display: flex;
            flex-direction: column;
            justify-content: center;
            gap: 15px;
            width: 100%;
        }

        .wpvoid-modern-404 .btn-primary,
        .wpvoid-modern-404 .btn-secondary {
            padding: 12px 20px;
            border-radius: 5px;
            text-decoration: none;
            font-weight: bold;
            transition: all 0.3s;
            display: block;
        }

        .wpvoid-modern-404 .btn-primary {
            background-color: #8c52ff; /* Updated Accent Color */
            color: white;
        }

        .wpvoid-modern-404 .btn-primary:hover {
            background-color: #7a46e0;
        }

        .wpvoid-modern-404 .btn-secondary {
            background-color: transparent;
            border: 2px solid #1e1926; /* Updated Border Color (Text Color) */
            color: #1e1926; /* Updated Text Color */
        }

        .wpvoid-modern-404 .btn-secondary:hover {
            background-color: #1e1926;
            color: white;
        }

        /* --- Tablet and Desktop Responsiveness (Min-width 768px) --- */
        @media (min-width: 768px) {
            .wpvoid-modern-404 {
                flex-direction: row;
                text-align: left;
            }

            .wpvoid-modern-404 .error-image-area {
                flex: 1;
                padding-right: 40px;
            }

            .wpvoid-modern-404 .error-content-area {
                flex: 1;
                max-width: none;
                margin-top: 0;
            }

            .wpvoid-modern-404 .error-image {
                max-width: 100%;
            }

            .wpvoid-modern-404 h1 {
                font-size: 4em;
            }

            .wpvoid-modern-404 .navigation-links {
                flex-direction: row;
                justify-content: flex-start;
            }
            .wpvoid-modern-404 .btn-primary,
            .wpvoid-modern-404 .btn-secondary {
                display: inline-block;
                width: auto;
            }
        }
    </style>
</head>
<body>
    <div class="wpvoid-404-container wpvoid-modern-404">
        <div class="error-image-area">
            <img src="https://wpvoid.com/wp-content/uploads/2025/12/Wpvoid_404_sample_image.png" alt="Wpvoid 404 Page Not Found" class="error-image">
        </div>
        <div class="error-content-area">
            <h1>404 Error - Page Lost</h1>
            <p class="subtitle">It seems the page you were looking for doesn't exist on **wpvoid**.</p>
            <div class="search-form-wrapper">
                <form role="search" method="get" class="search-form" action="/">
                    <label>
                        <span class="screen-reader-text">Search for:</span>
                        <input type="search" class="search-field" placeholder="Try searching wpvoid..." value="" name="s" />
                    </label>
                    <input type="submit" class="search-submit" value="Search" />
                </form>
            </div>

            <div class="navigation-links">
                <a href="/" class="btn-primary">Go to **wpvoid** Homepage</a>
                <a href="/blog/" class="btn-secondary">Check out Latest Guides</a>
            </div>
        </div>
    </div>
</body>
</html><!DOCTYPE html>
<html lang="en">
<head>
<meta charset="UTF-8" />
<meta name="viewport" content="width=device-width, initial-scale=1.0" />
<title>Page Not Found | wpvoid</title>
<style>
/* New Color Palette: */
/* Main Accent: #8c52ff */
/* Background: #fef6ff */
/* Text Color: #1e1926 */
/* --- Base 404 Styling --- */
.wpvoid-minimal-404 {
display: flex;
flex-direction: column;
align-items: center;
text-align: center;
padding: 30px 20px;
min-height: 75vh;
justify-content: center;
background-color: #fef6ff; /* Updated Background Color */
font-family: "Helvetica Neue", sans-serif;
color: #1e1926; /* Updated Text Color */
}
.wpvoid-minimal-404 .error-header {
margin-bottom: 20px;
}
.wpvoid-minimal-404 .error-code-large {
font-size: 8em;
font-weight: 900;
color: #d8c2ff; /* Lighter shade of accent for subtle code */
line-height: 1;
display: block;
}
.wpvoid-minimal-404 h2 {
font-size: 1.8em;
color: #8c52ff; /* Updated Accent Color */
margin-top: -10px;
}
.wpvoid-minimal-404 .error-content {
max-width: 650px;
}
.wpvoid-minimal-404 p {
color: #1e1926; /* Ensure paragraph text uses the primary text color */
}
.wpvoid-minimal-404 .error-image {
max-width: 250px;
height: auto;
margin: 20px auto;
display: block;
}
/* --- CTA Styling --- */
.wpvoid-minimal-404 .cta-section {
margin: 30px 0;
}
.wpvoid-minimal-404 .cta-button {
background-color: #8c52ff; /* Updated Accent Color */
color: white;
padding: 15px 30px;
font-size: 1.1em;
font-weight: bold;
text-decoration: none;
border-radius: 50px;
transition: background-color 0.3s, transform 0.2s;
box-shadow: 0 4px 6px rgba(140, 82, 255, 0.3); /* Subtle shadow matching the accent */
display: inline-block;
}
.wpvoid-minimal-404 .cta-button:hover {
background-color: #7a46e0;
transform: translateY(-2px);
}
.wpvoid-minimal-404 .secondary-actions a {
color: #1e1926; /* Updated Text Color */
text-decoration: none;
font-size: 0.9em;
transition: color 0.3s;
}
.wpvoid-minimal-404 .secondary-actions a:hover {
color: #8c52ff; /* Updated Accent Color */
text-decoration: underline;
}
/* --- Responsiveness --- */
@media (max-width: 480px) {
.wpvoid-minimal-404 .error-code-large {
font-size: 6em;
}
.wpvoid-minimal-404 h2 {
font-size: 1.5em;
}
.wpvoid-minimal-404 .cta-button {
padding: 12px 25px;
}
}
</style>
</head>
<body>
<div class="wpvoid-404-container wpvoid-minimal-404">
<div class="error-header">
<span class="error-code-large">404</span>
<h2>Oops! This Page is Missing from **wpvoid**</h2>
</div>
<div class="error-content">
<p>
We searched everywhere, but couldn't find the file you requested. It
might have been deleted or moved.
</p>
<p>But don't go! We have plenty of other great content for you.</p>
<img
src="https://wpvoid.com/wp-content/uploads/2025/12/Wpvoid_404_sample_image.png"
alt="Wpvoid Page Not Found"
class="error-image"
/>
<div class="cta-section">
<a href="/" class="cta-button">Return to **wpvoid** Homepage</a>
</div>
<div class="secondary-actions">
<a href="/contact/">Report the Error</a> |
<a href="/categories/">Browse Topics</a>
</div>
</div>
</div>
</body>
</html>
<!DOCTYPE html>
<html lang="en">
  <head>
    <meta charset="UTF-8" />
    <meta name="viewport" content="width=device-width, initial-scale=1.0" />
    <title>Error 404 | wpvoid</title>
    <style>
      /* New Color Palette: */
      /* Main Accent: #8c52ff */
      /* Background: #fef6ff */
      /* Text Color: #1e1926 */

      /* --- Base 404 Styling --- */
      .wpvoid-structured-404 {
        padding: 40px 20px;
        min-height: 70vh;
        display: flex;
        align-items: center;
        justify-content: center;
        background-color: #fef6ff; /* Updated Background Color */
        font-family: Roboto, sans-serif;
        color: #1e1926; /* Updated Text Color */
      }

      .wpvoid-structured-404 .content-wrapper {
        display: flex;
        flex-wrap: wrap;
        gap: 40px;
        max-width: 1200px;
        background: white;
        padding: 40px;
        border-radius: 10px;
        box-shadow: 0 4px 12px rgba(0, 0, 0, 0.05);
      }

      .wpvoid-structured-404 .text-column {
        flex: 2;
        min-width: 300px;
      }

      .wpvoid-structured-404 .cta-column {
        flex: 1;
        min-width: 250px;
      }

      .wpvoid-structured-404 h3 {
        color: #8c52ff; /* Updated Accent Color */
        font-size: 1.2em;
        margin-bottom: 5px;
      }

      .wpvoid-structured-404 h1 {
        font-size: 2.5em;
        margin-top: 0;
        margin-bottom: 20px;
        color: #1e1926;
      }

      .wpvoid-structured-404 p {
        color: #1e1926;
      }

      .wpvoid-structured-404 .quick-links {
        list-style: none;
        padding: 0;
        margin-top: 25px;
      }

      .wpvoid-structured-404 .quick-links li {
        margin-bottom: 10px;
      }

      .wpvoid-structured-404 .quick-links a {
        color: #8c52ff; /* Use accent for link color */
        text-decoration: none;
        font-weight: 500;
      }

      .wpvoid-structured-404 .quick-links a:hover {
        text-decoration: underline;
      }

      /* --- CTA Box Styling (Lead Capture) --- */
      .wpvoid-structured-404 .cta-box-subscribe {
        background-color: #fff; /* White background for the inner box */
        padding: 30px;
        border-radius: 8px;
        border: 1px solid #d8c2ff; /* Light border */
        border-left: 5px solid #8c52ff; /* Updated Accent Color border */
        box-shadow: 0 2px 5px rgba(0, 0, 0, 0.05);
      }

      .wpvoid-structured-404 .cta-box-subscribe h4 {
        margin-top: 0;
        color: #8c52ff; /* Updated Accent Color */
        font-size: 1.1em;
      }

      .wpvoid-structured-404 .subscribe-form {
        display: flex;
        flex-direction: column;
        gap: 10px;
        margin-top: 15px;
      }

      .wpvoid-structured-404 .subscribe-form input[type="email"] {
        padding: 10px;
        border: 1px solid #ddd;
        border-radius: 5px;
        color: #1e1926;
      }

      .wpvoid-structured-404 .subscribe-form button {
        background-color: #8c52ff; /* Updated Accent Color */
        color: white;
        padding: 10px;
        border: none;
        border-radius: 5px;
        cursor: pointer;
        font-weight: bold;
        transition: background-color 0.3s;
      }

      .wpvoid-structured-404 .subscribe-form button:hover {
        background-color: #7a46e0;
      }

      /* --- Image Handling --- */
      .wpvoid-structured-404 .error-image-mobile {
        display: none;
      }

      /* --- Tablet and Mobile Responsiveness --- */
      @media (max-width: 768px) {
        .wpvoid-structured-404 .content-wrapper {
          flex-direction: column;
          padding: 25px;
        }

        .wpvoid-structured-404 .cta-column {
          order: -1;
        }

        .wpvoid-structured-404 .error-image-mobile {
          display: block;
          max-width: 150px;
          height: auto;
          margin: 20px auto;
        }
      }
    </style>
  </head>
  <body>
    <div class="wpvoid-404-container wpvoid-structured-404">
      <div class="content-wrapper">
        <div class="text-column">
          <h3>Something Went Wrong (Error 404)</h3>
          <h1>Uh Oh! This Link is Broken on **wpvoid**</h1>
          <p>
            We apologize! The page you tried to access is not available. Please
            use the options below to find what you need.
          </p>

          <ul class="quick-links">
            <li><a href="/">➤ Go back to the Homepage</a></li>
            <li><a href="/contact/">➤ Contact **wpvoid** Support</a></li>
            <li><a href="/about/">➤ Learn More About Us</a></li>
          </ul>

          <img
            src="https://wpvoid.com/wp-content/uploads/2025/12/Wpvoid_404_sample_image.png"
            alt="Wpvoid Error"
            class="error-image-mobile"
          />
        </div>

        <div class="cta-column">
          <div class="cta-box-subscribe">
            <h4>Don't miss out on future content!</h4>
            <p>
              Subscribe to the **wpvoid** newsletter and get our latest guides
              delivered weekly.
            </p>
            <form class="subscribe-form" action="#" method="POST">
              <input
                type="email"
                placeholder="Enter your email address"
                required
              />
              <button type="submit">Subscribe Now</button>
            </form>
          </div>
        </div>
      </div>
    </div>
  </body>
</html>
Should I use a 301 Redirect or a 404 error when I delete an old page?
You should almost always use a 301 Redirect if the deleted page has a relevant substitute or if you want to preserve the page's SEO value (link equity) by pointing it to a new, related page.
Are there different "types" of 404 errors beyond the standard "Not Found"?
Yes, servers can return more specific 404 codes, though they are less common. Examples include 404.1 (Site Not Found), 404.14 (Request URL too long), or 410 Gone.
Is it better to include a search bar on a custom 404 page?
A search bar is generally better for immediate user utility, as it allows the visitor to directly input what they are trying to find.